
Blog
In March we released the shop feature for At The Yard after more than a year of testing. It’s allowed our customers to reach a wider audience and create more opportunities for their customers to use and benefit from the facilities and services they offer.
But we didn’t want to stop there, we had more ideas to add new features and improvements which we’re highlighting over the next few posts.
This is one post of multi a part series:
Today we’re highlighting the second update, Image Galleries. Our customers have some of the best facilities around and rightly so they want to show them off! We’re delighted to help them do so by allowing them to post as many pictures of their facilities as they want.
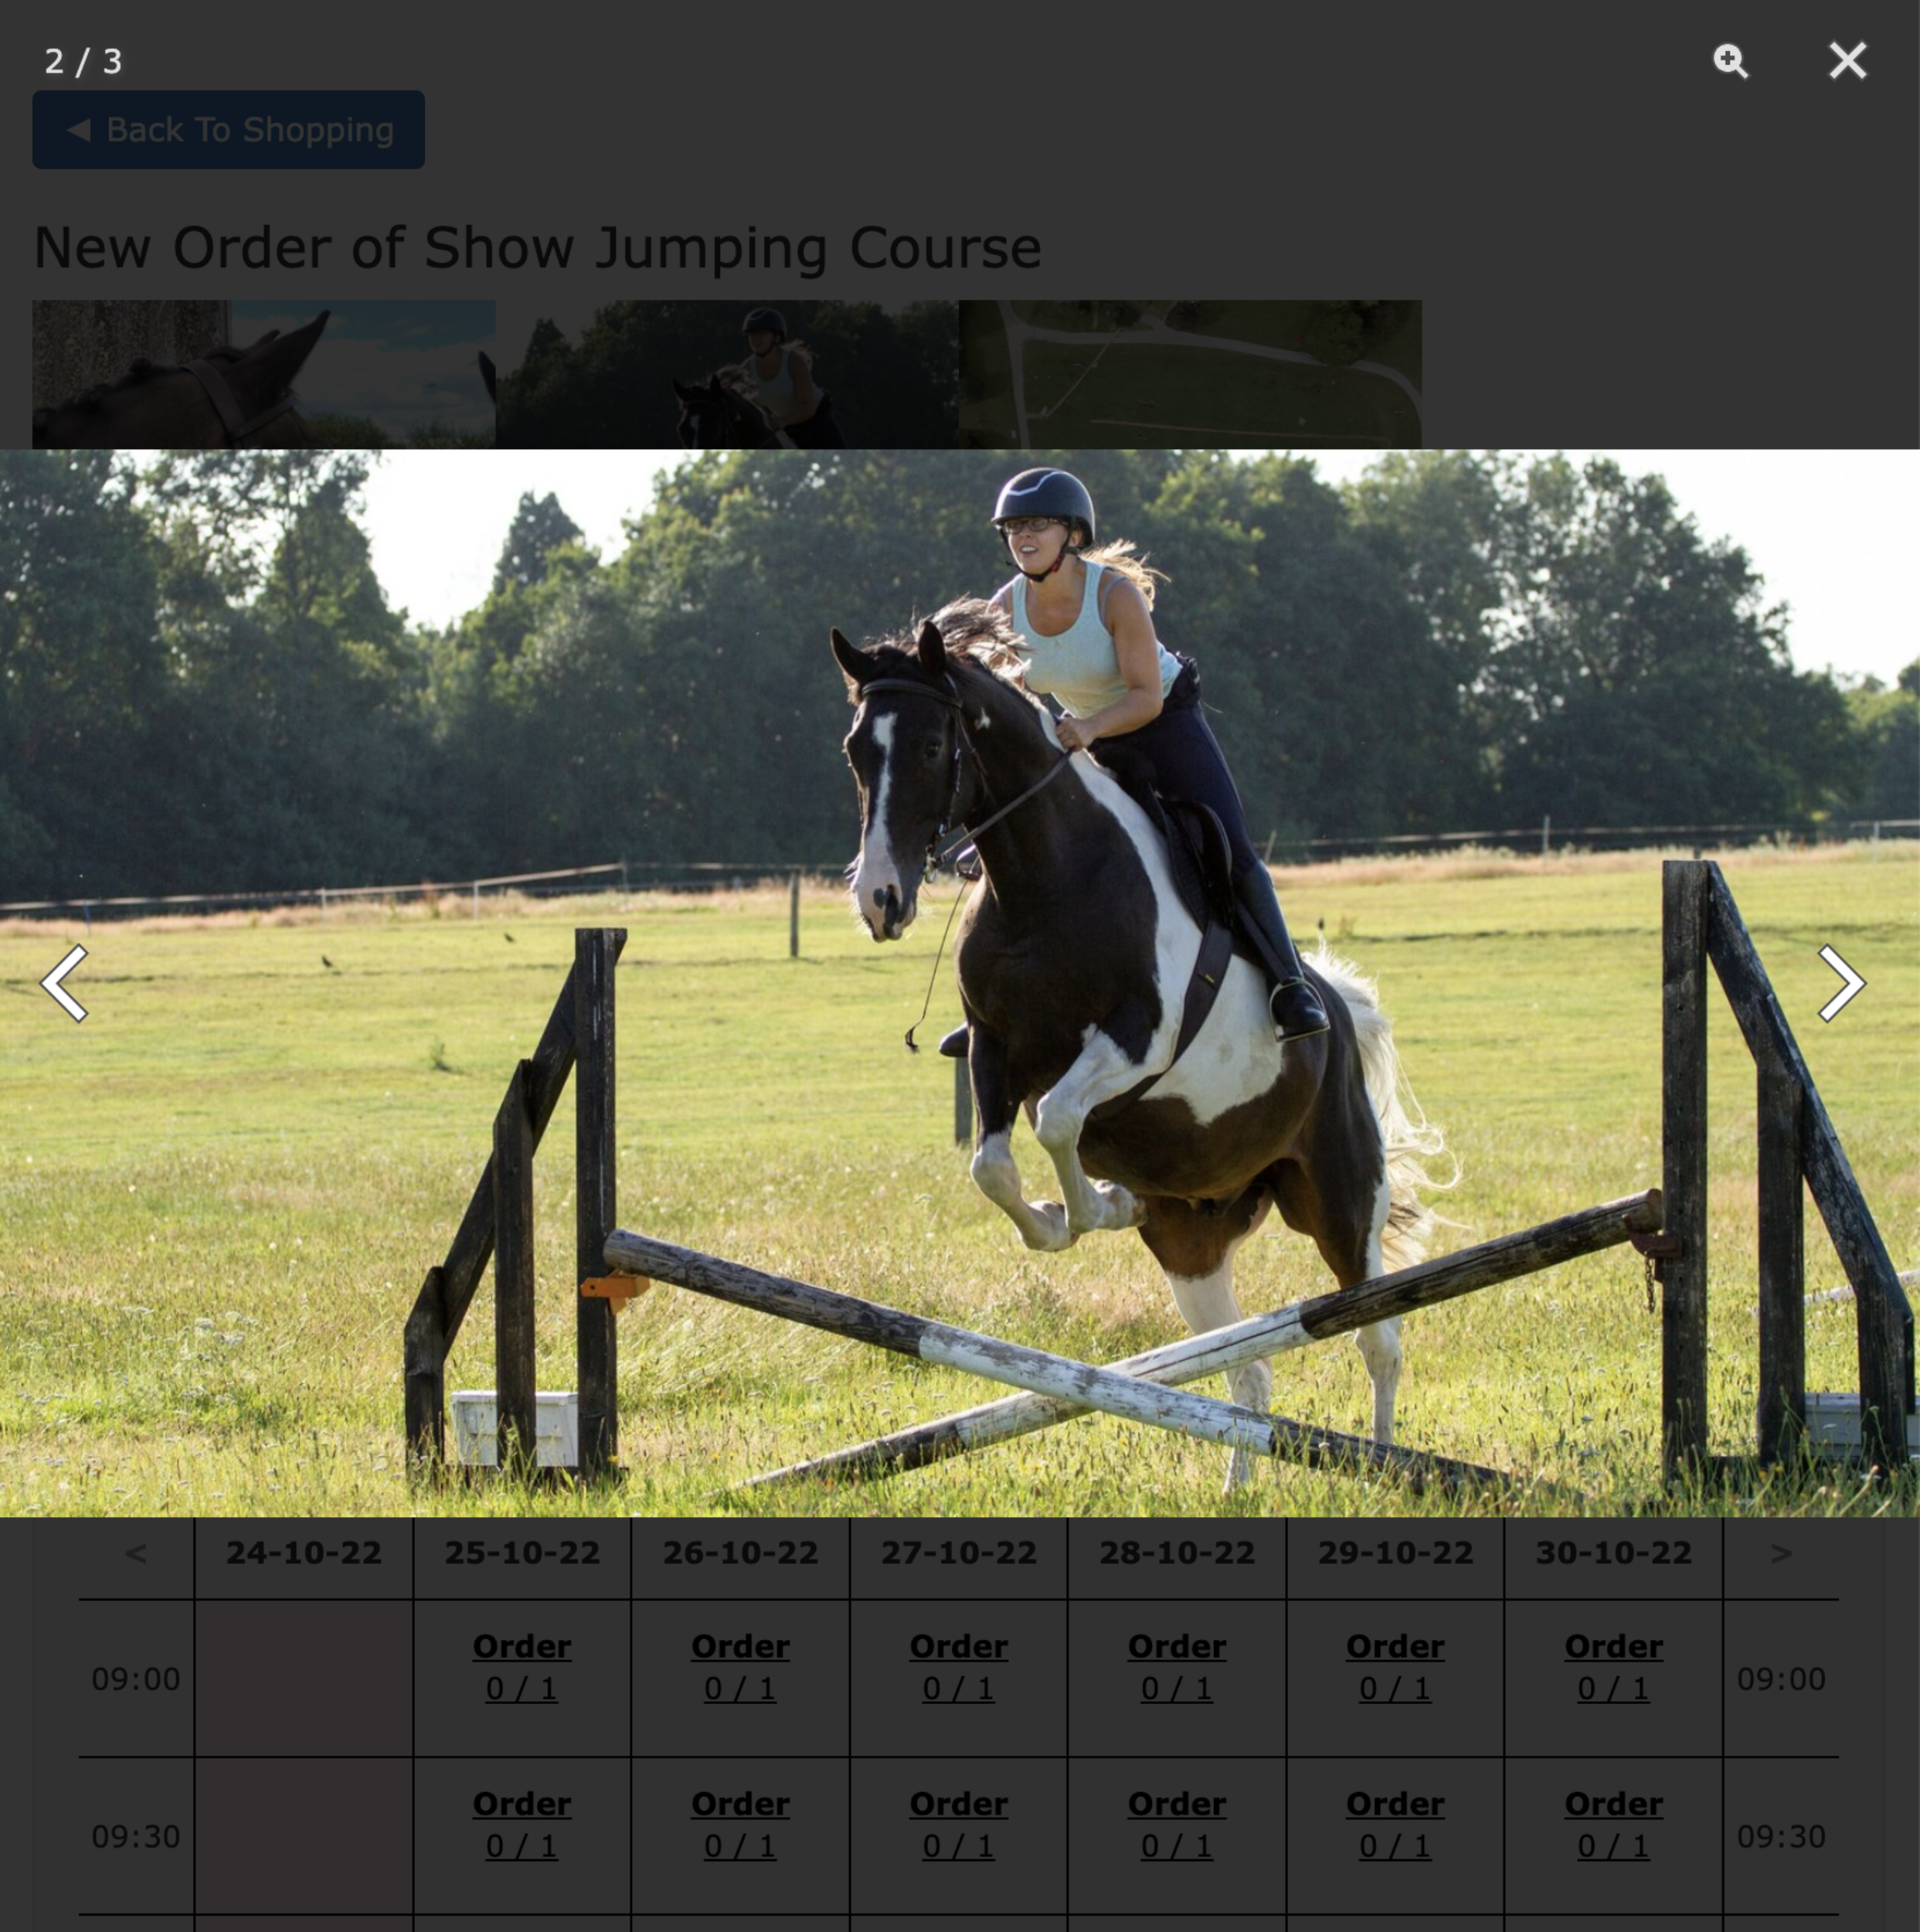
Let’s start by taking a look at how your customers will see these galleries.

A service overview page showing the 3 images of the facility, a description and the available bookings.
Clicking on any of the images allows people to take a look at the image in a bigger form. This is great for showing an a aerial overview of a course as shown in one of the images below.

Setup is quick and easy. Go to the Manage Shop page via the admin menu and click on Edit Publication. Scroll down to the Extra Information section and you’ll now see a new option for Gallery Images (shown below).
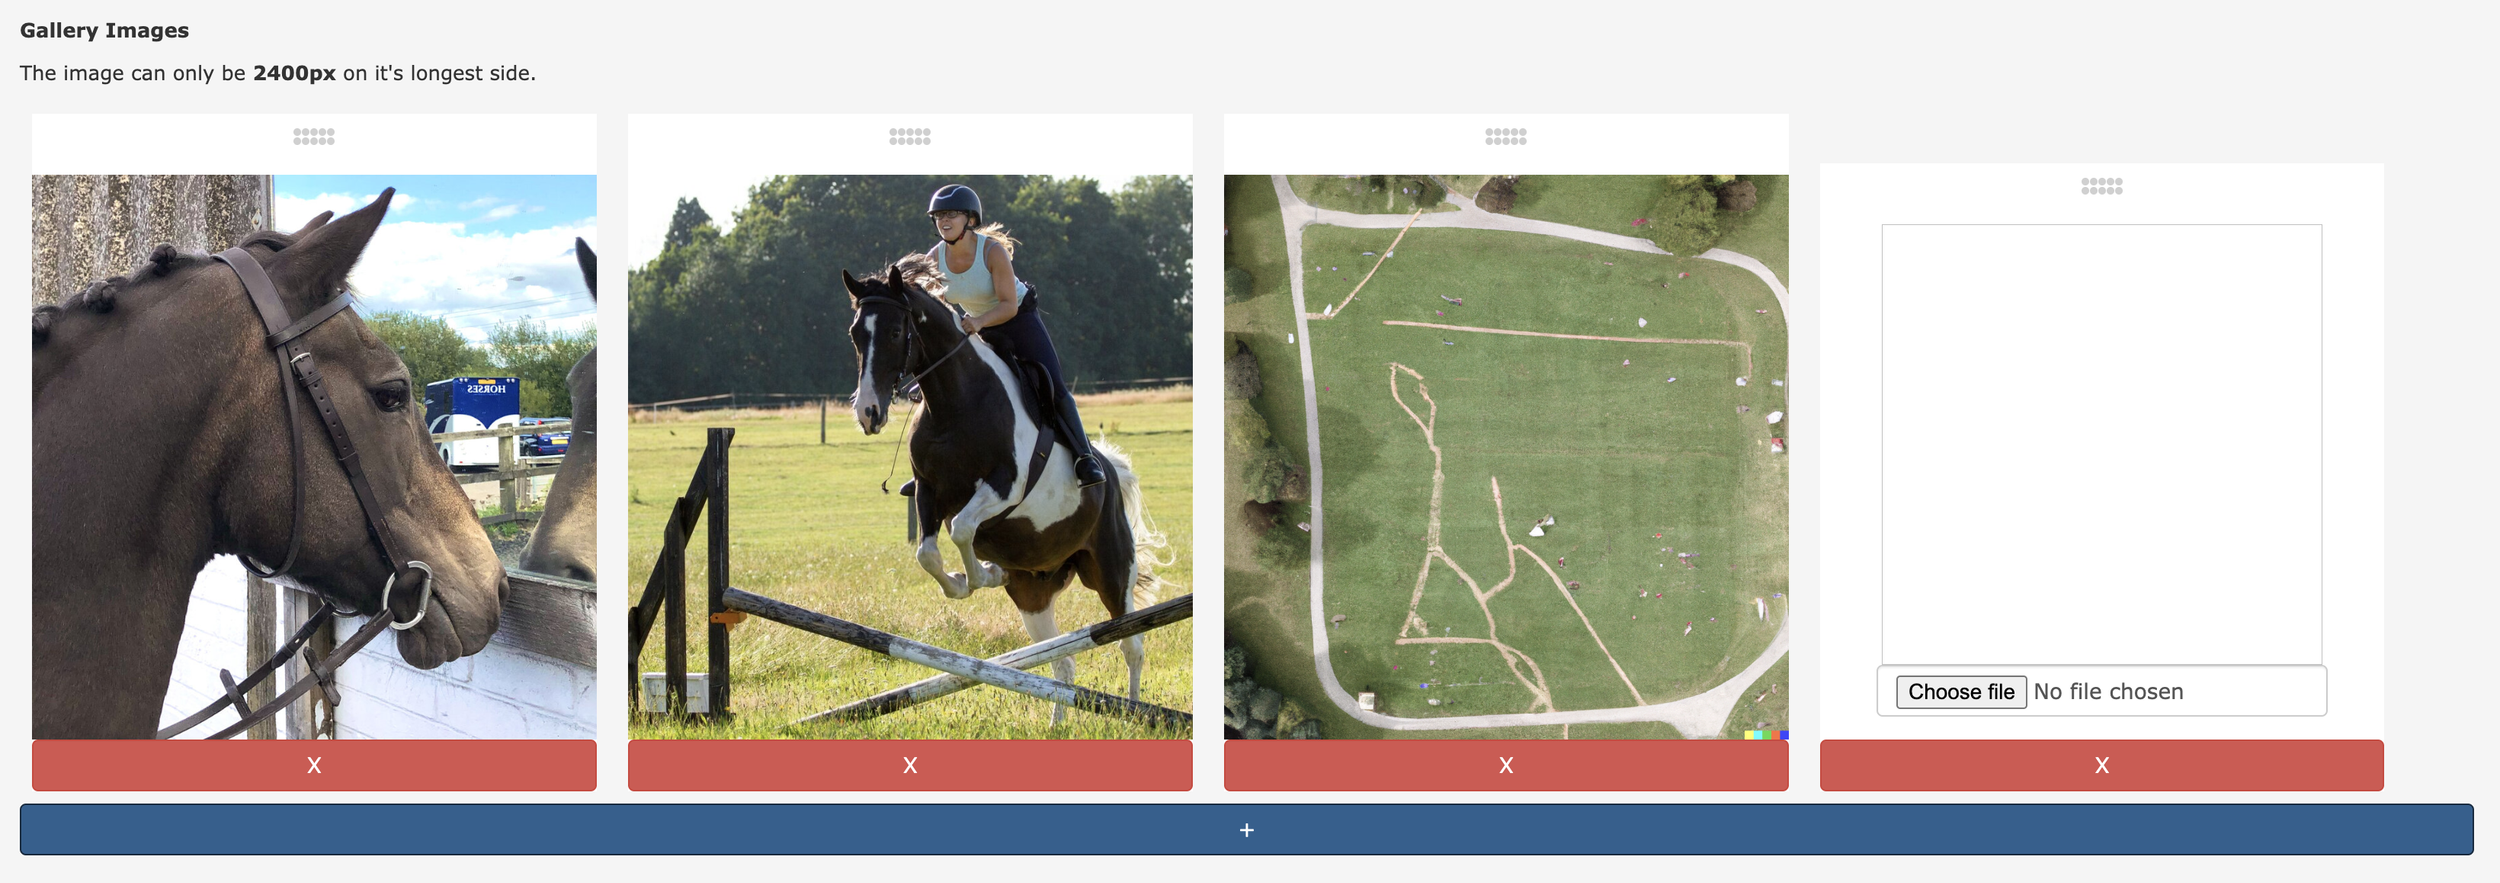
From here you can see your existing images (if you’ve already set some up) and have the option to add more by clicking on the blue + button at the bottom. When you click on the button a new blank option (shown on the far right) will be created allowing you to upload a new image.
You can then use the drag handles located at the top of the images to move everything around into the order you want.
When you’re ready, simply click submit and everything will be updated and ready to go!
Images are a fundamental way we make choices when shopping and with this update we’re excited to have expanded the pre-sales experience you can offer your customers. As we mentioned at the top of the post this is part of a multi-part series highlighting updates that we’ve brought to the shop since it’s launch, so check back soon for the next update.
Making At The Yard easy to use is something we’re always working to improve. Today’s update represents a huge improvement to the experience of our new customers setting up At The Yard for the first time.
We’re announcing our new Yard Setup Wizard. This new feature will help get new yards up and running in At The Yard in record time. It allows you to setup the following in a matter of minutes:
Take a look at the video below to see just how easy it can be to get At The Yard up and running for your yard.

Today we’re taking a look back at an existing feature - Included Services Schemes. This feature was introduced to allow the setup of Livery/Membership packages which include a number of services.
For example your full livery may include:
With Included Services Schemes we can setup the allowances within At The Yard and track how many services a horse has used. Then once they exceed the included allowance the system will automatically raise a charge for any additional orders for a service.
When we combine this feature with At The Yard’s Included Facilities Schemes (https://www.attheyard.co.uk/blog/2020/1/7/included-facilities-schemes)) and Included Products it allows us to codify, track and automatically raise a charge for any extras that are not included for a customer.
Included services can be setup on any of your ‘Continuous’ services e.g. Livery or Membership. To start the process go to the Admin, Services page and locate your service. To the right hand side of the service’s row you’ll see a button with a drop down. When you click the dropdown you’ll see a list of options (shown below) which includes Edit Included Services Schemes. Click on this to start setting up your first scheme.

To begin with you’ll see an empty list of existing schemes and also, of more interest to start with, a button called New Included Services Scheme. When clicked it’ll bring up a page allowing you to choose the type of scheme you wish to create.
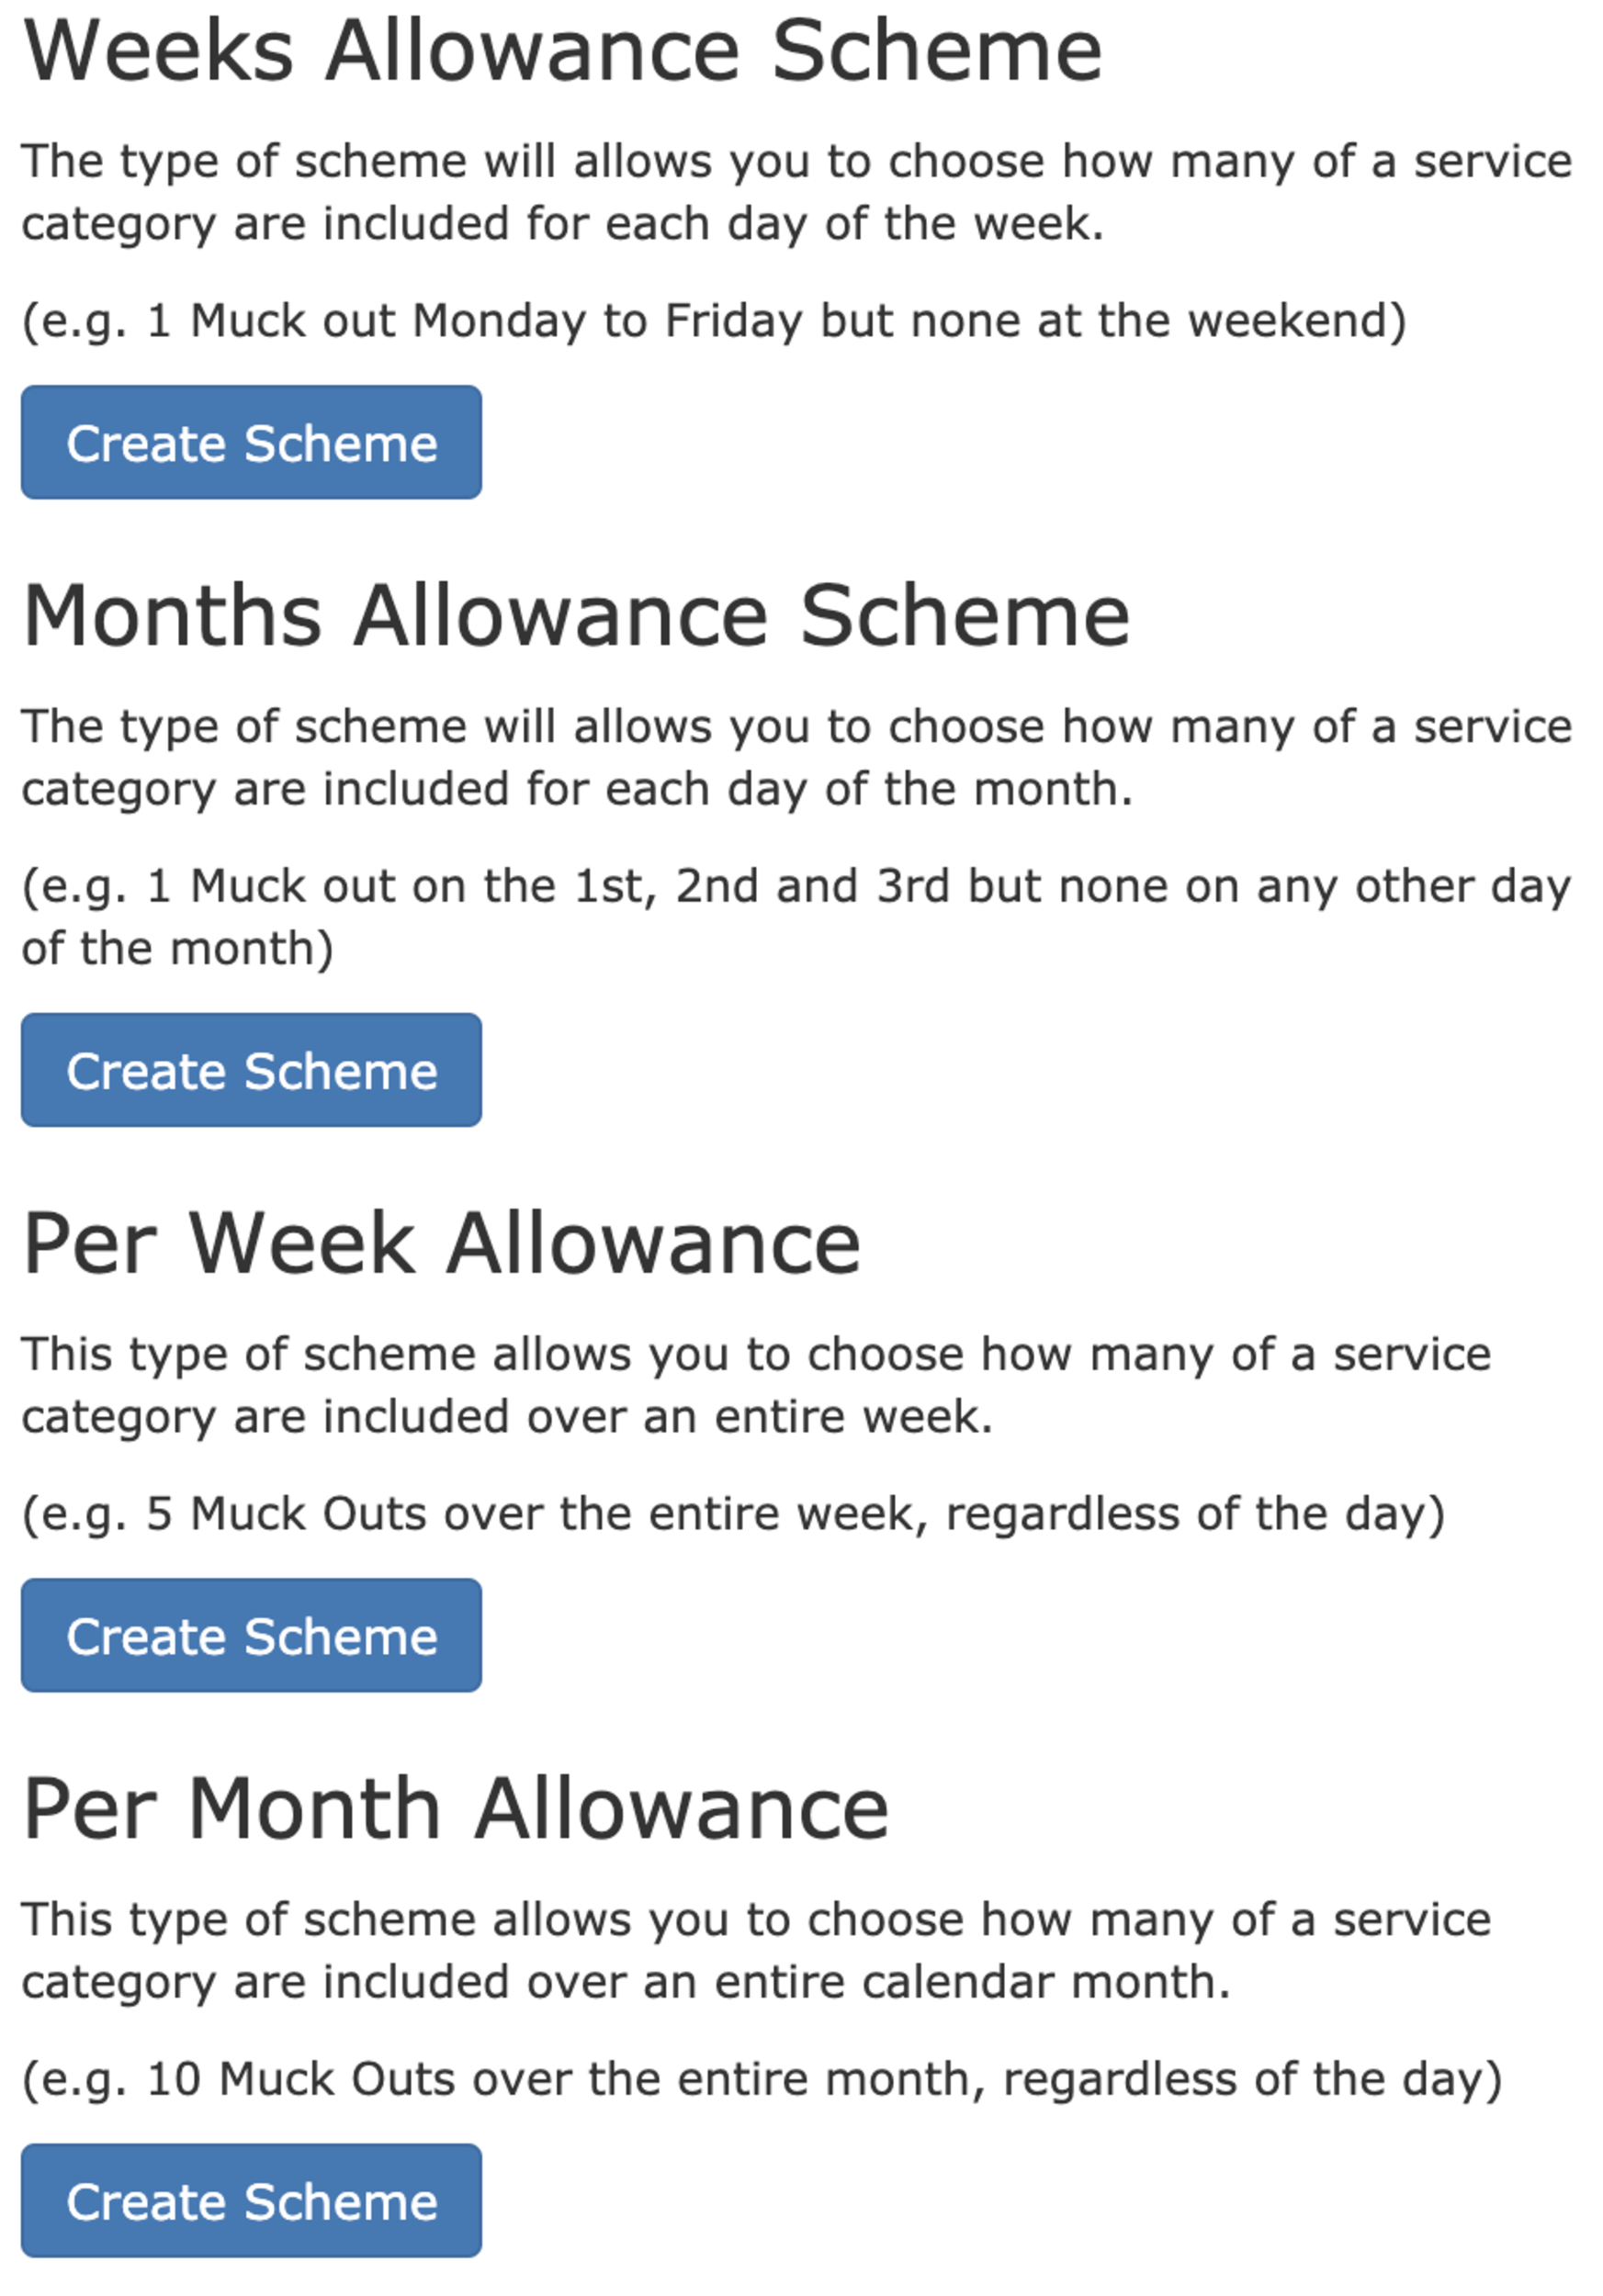
This screen will explain the types of schemes you can setup. At the time of writing there are 4 types of scheme; Weeks Allowance, Months Allowance, Per Week Allowance and Per Month Allowance.
Each of these are explained in the dialog. In this example we’re going to create two different schemes to achieve a basic setup for a livery package.
The first is a Weeks Allowance Scheme will be used to setup the allowances for turn outs and bring ins. The second, a Per Week Allowance, will be used to setup an exercise allowance.
Once you’ve selected the scheme you wish to use you’ll be presented with an interface to set the allowance for each day.
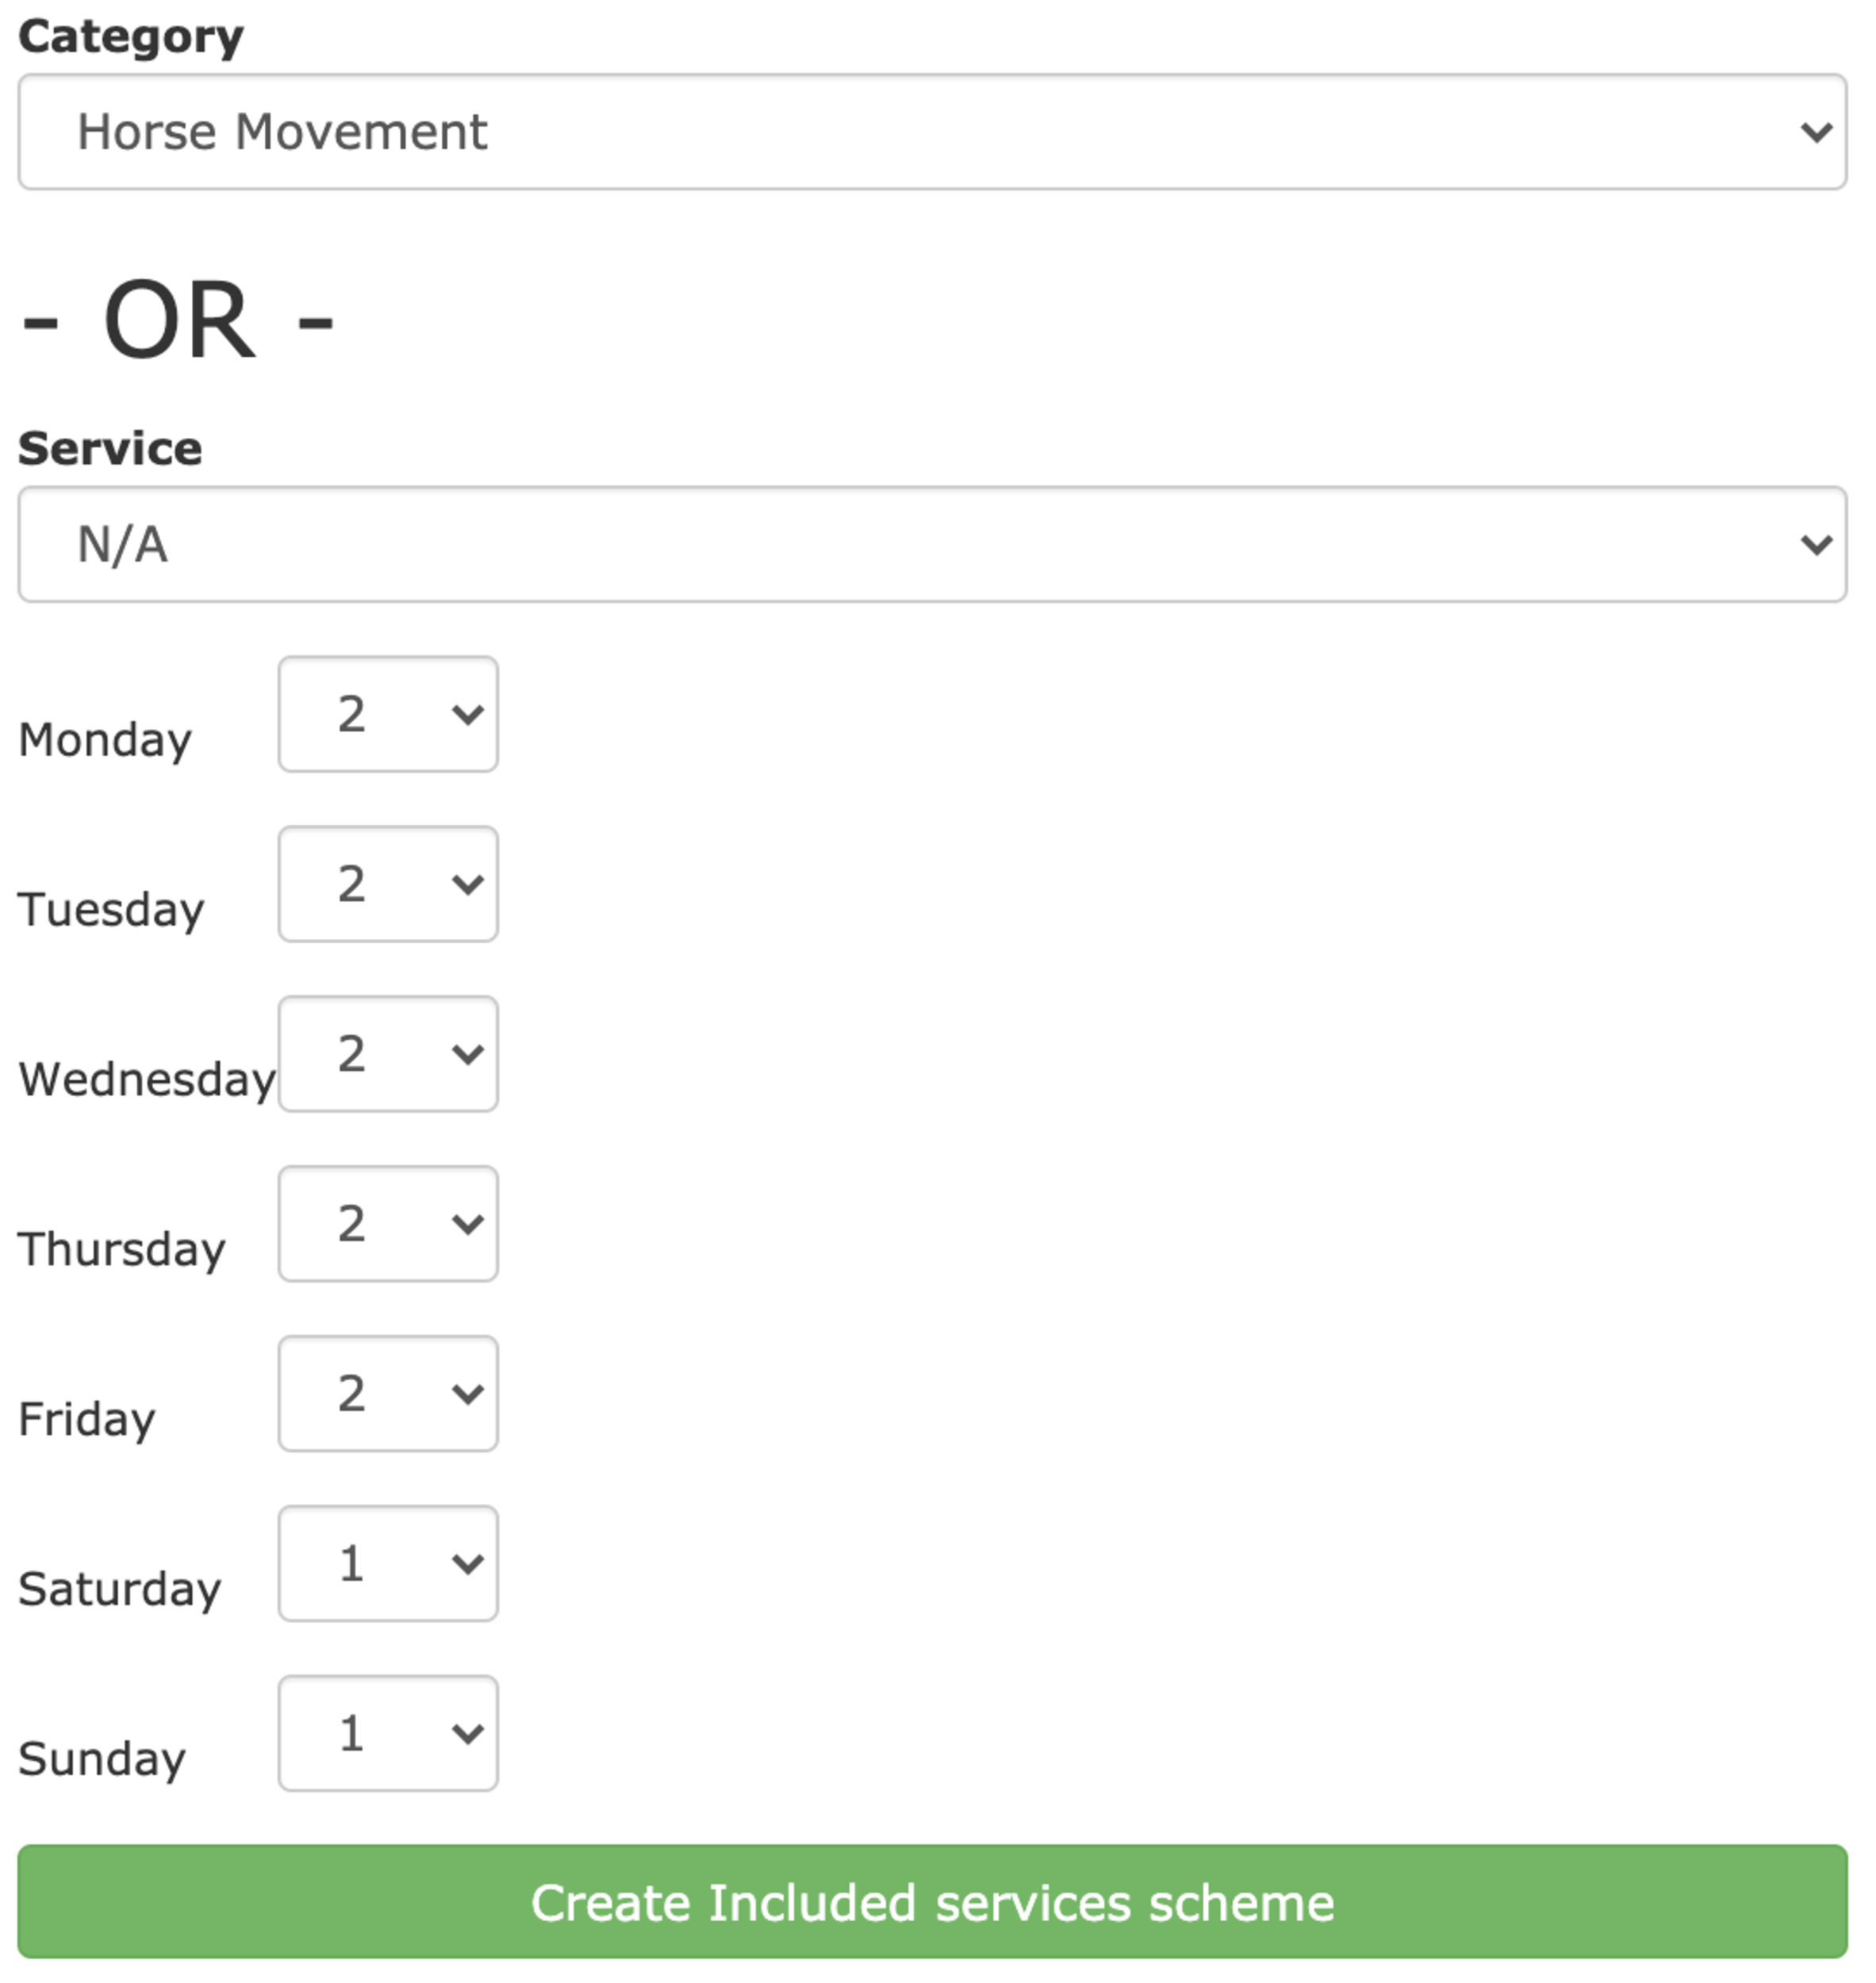
You have the option to setup an allowance for a single service or for a category of services. In this example we have created the category called Horse Movement which includes both Turn Out and Bring In.
You can then choose how many of these are included as part of the package for each day in the week.
In this example we’ve setup your typical 5 Full/2 Part style livery in which over the weekends they only get to choose from either Bring In or Turn Out where as in the week they get both included as part of their package.
Once you’re happy you can click on Create and your new scheme will be ready.
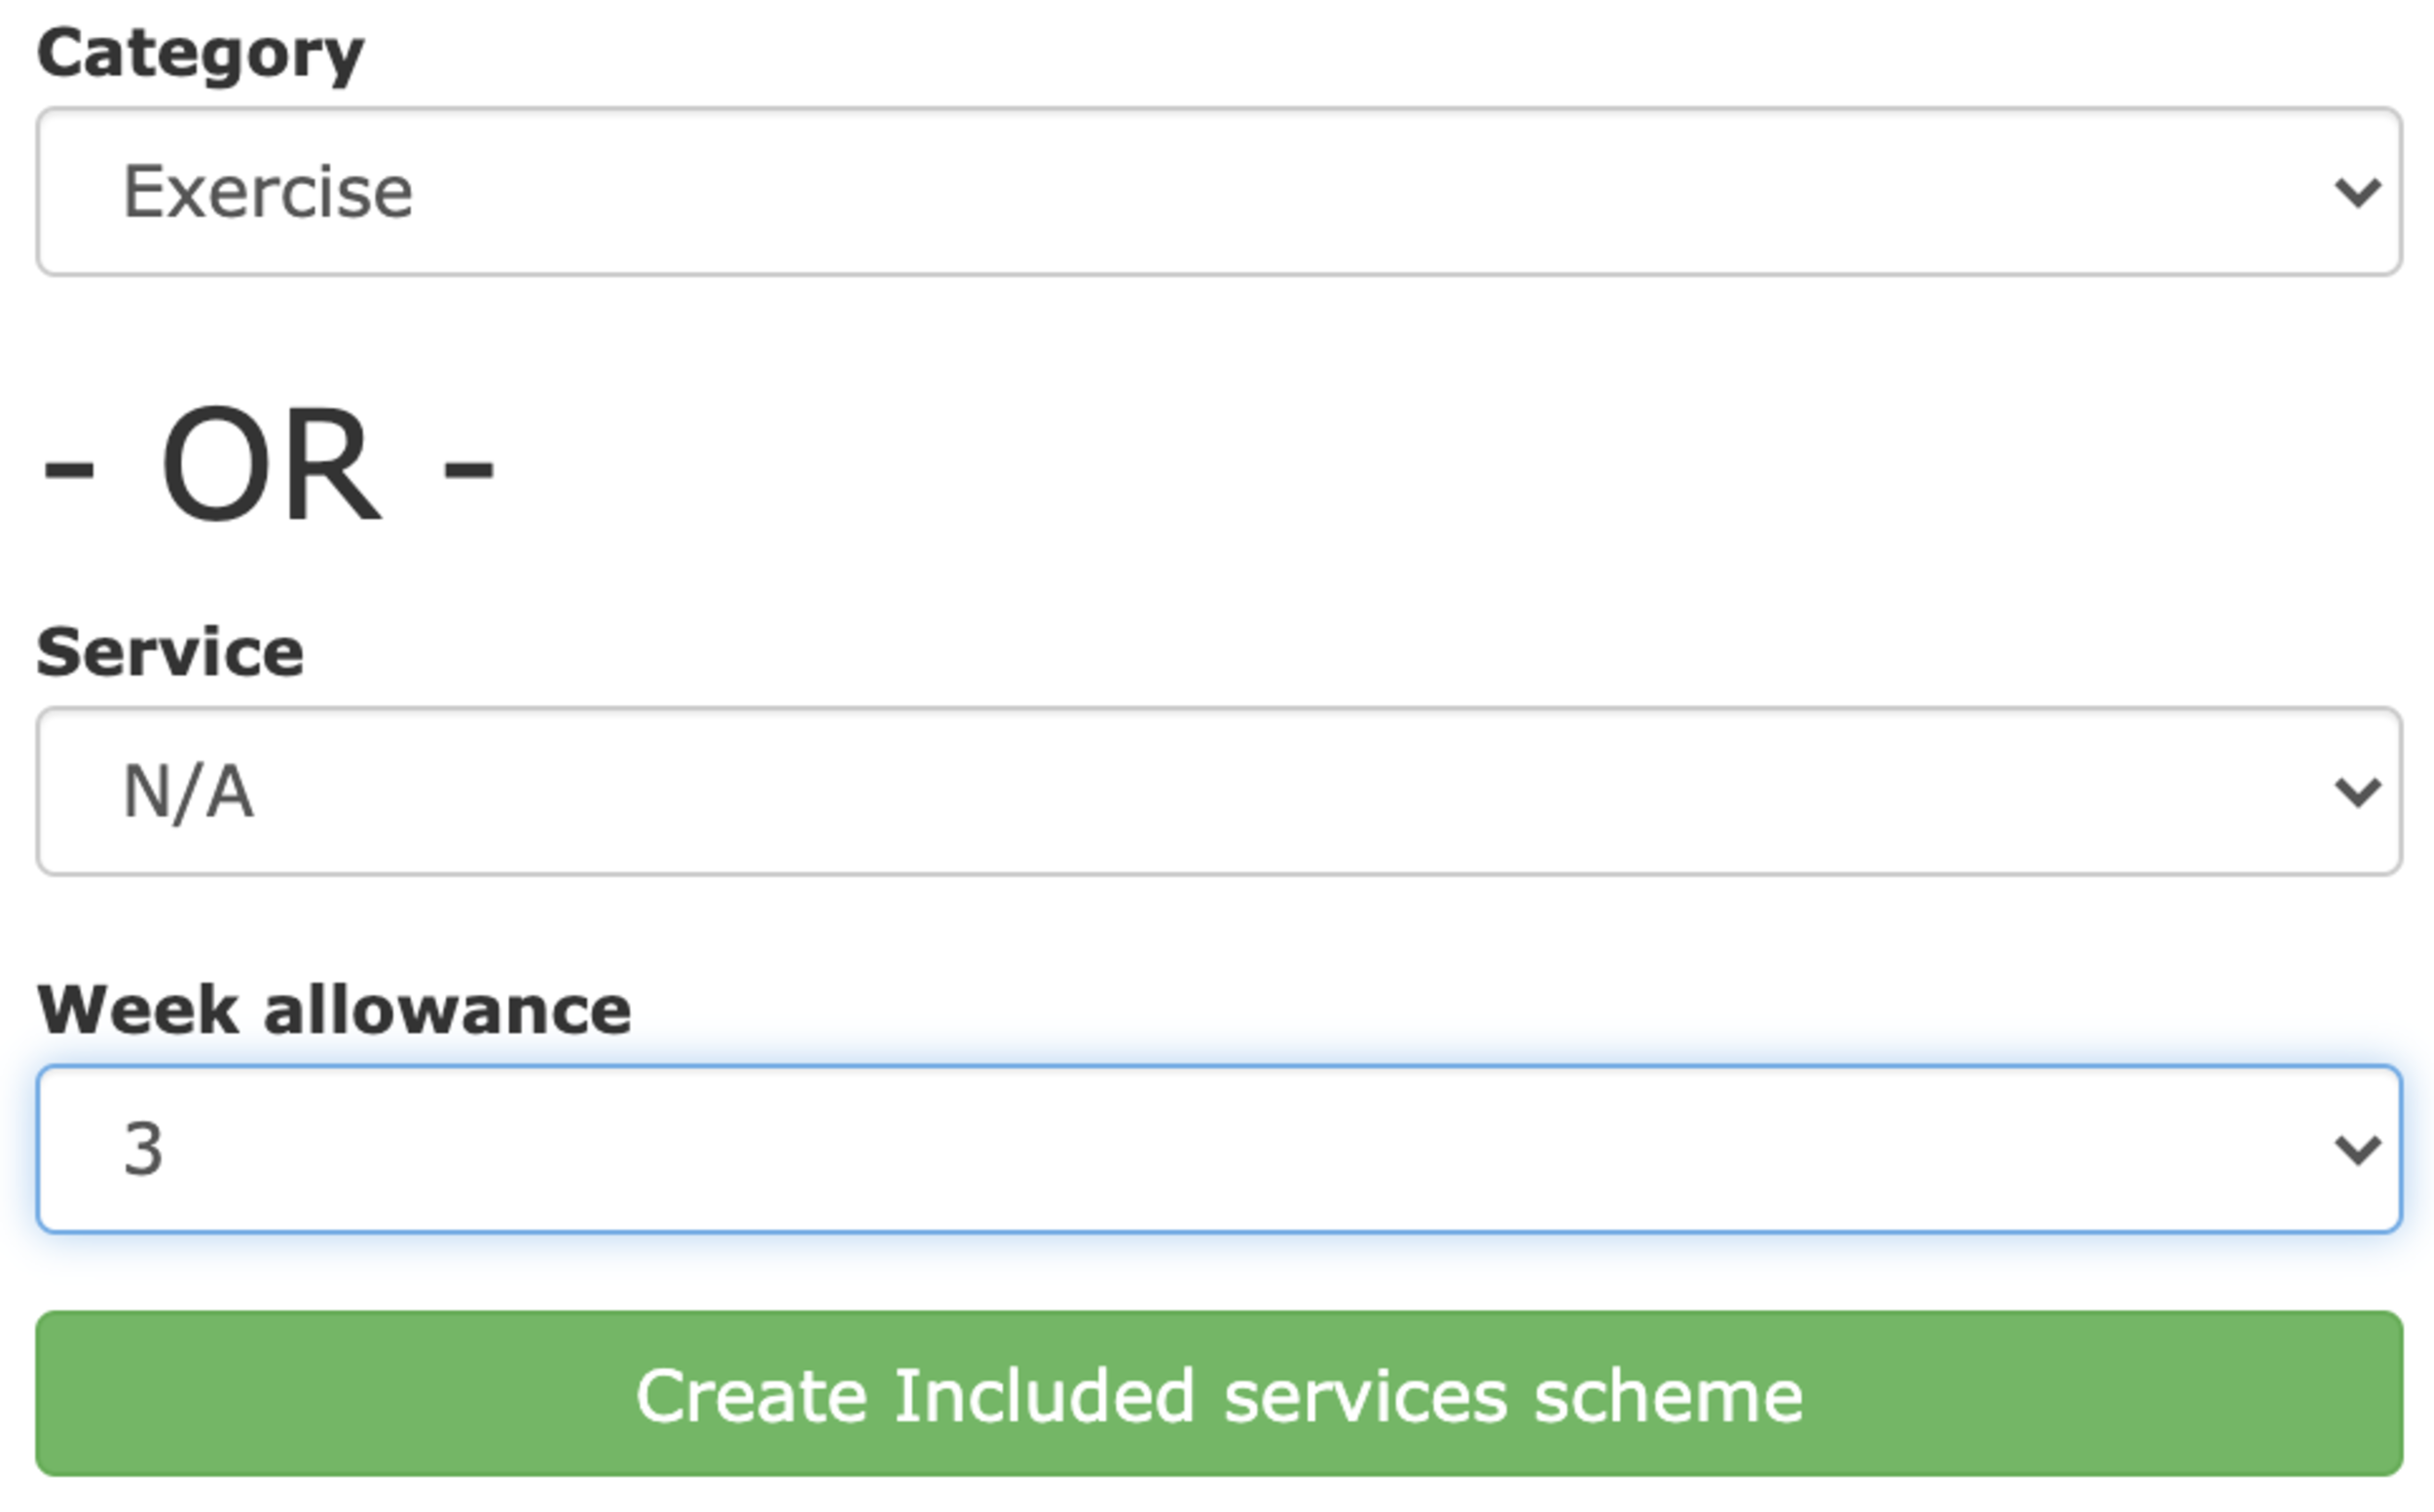
The per week allowance is slightly different in that, instead of allowances being on predefined days, a user is given the choice of which days in a given week their allowance is used. Because of this the setup screen is slightly different.
Again you can choose a category (in this case Exercise) and set the number of these included in a given week.
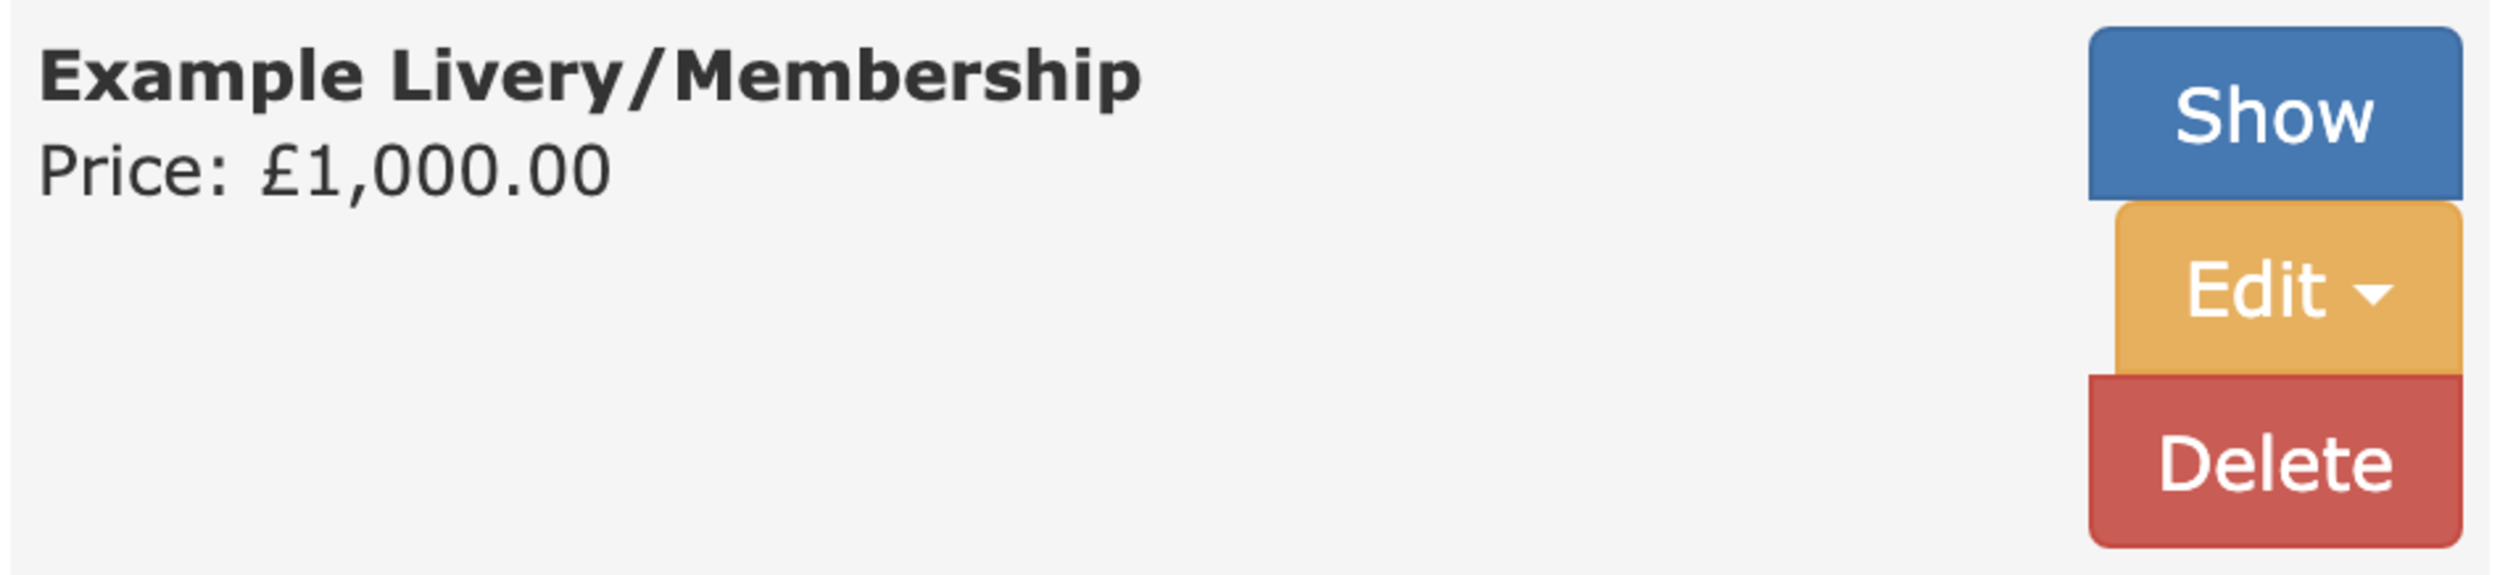
Once you’ve finished creating your schemes you can click back on edit for the service and get an overview of everything included (shown below).

This not only allows you at a glance to see what subscribers to the service will receive but also lets you see what services are part of a given category. As you’d expect you can also go in and edit the scheme or remove it entirely.
For a user to receive these schemes they simply need to have an active subscription to the service and from there At The Yard will automatically track everything, meaning both the yard and user can go ahead and order services without having to worry about manually keeping track.
Keeping track of billable costs at a livery yard is much more than just charging for livery and any extras. You have to be able to calculate costs incurred for usage beyond what’s included, whether it’s for extra services, products or facilities.
With the included services schemes feature we’ve looked at today you can keep track of everything automatically. This not only ensures you’re paid for additional services you provide your customers but also makes things fairer for everyone - it makes sure that one horse at the yard is not excessively using the yards resources without paying their fair share.
It’s a win win - the yard realises the revenue it should already be receiving and customers are happier due to the equitable service received for their livery bill.
If recent events have taught us anything, its that being able to quickly and easily distribute information to your customers is highly important. To help with this we’ve developed our latest new feature, called simply Notices.
Simple but effective, we’ve built Notices to cover a wide range of scenarios at your yard. These include:
For each notice you publish you’ll be able to decide who will see the notice, optionally include a checkbox to get their response and even mandate that they have to agree before proceeding (great for T&Cs updates).
Then, as a yard owner, you’ll receive insights for each notice you publish. Meaning it’s quick and easy to keep track of who’s yet to get the latest update about the yard.
By design we’ve made Notices incredibly simple for your customers. Whenever they visit the control panel, if a new notice has been published, they will automatically see a simple popup (shown below).

In this popup they’ll see all the latest notices that they’ve yet to acknowledge. Each notice will be displayed on it’s own row and depending on the choices you’ve made they may also see a checkbox allowing them to choose their response.
When they’re ready they just click on Acknowledge. That’s all there is to it.
Actually creating the notices is nearly as easy as it is for the users to read and acknowledge them. To start, go to the Notices menu item under the Admin menu section.
You’ll see an outline of the notices you’ve created and the option to create a new one. The new notice form is shown below to the right.


You’ll be able to name the notice and fill in the content that makes up the notice itself. Once you’ve filled that in there are a few other options for you to choose from.
Reports are the end product of the notice system. They allow you to see an overview of how your customers have responded.

The report is broken down into two parts. Part 1 shows the users who have acknowledged (filled in) the notice and part 2 shows those who haven’t.
Within the Filled section you’ll see all the users who’ve filled it in along with other details such as their response and the time at which they responded. You can also filter by the value of the response.
On their own the reports allow you to keep track on the responses from your customers. However to extend their utility we’ve built an Export to CSV feature. With this the possibilities are endless, from doing your own analysis in other software (such as a spreadsheeting tool) through to exporting data to a 3rd party system (e.g marketing platforms) you can use the data however you need and take it to wherever it’s needed.
Notices is an example of a feature that we’ve built in part to support yards should the worst happen and some version of ‘lock down’ returns. We’ve got more ideas in the pipeline which we believe will help, but we’re also open to recommendations. If you have any suggestions please feel free to get in touch with us via our contact page. We’re open to considering any ideas you may have to help yards in these difficult times.

Can you believe the first week of 2020 is already over. We’re determined to get the year off with a bang so we’re excited to be announcing our first feature release of the year - Included Facilities Schemes.
This feature allows you to manage the included facility usage you get as part of a livery/membership package. This brings it inline with the existing feature that allowed you to manage the included services.
We built this system on top of our previous work with service allowances and so it works in a very similar way. This means if you’re used to setting up the services that come included with your livery package you’ll find setting up included facilities quick and easy.

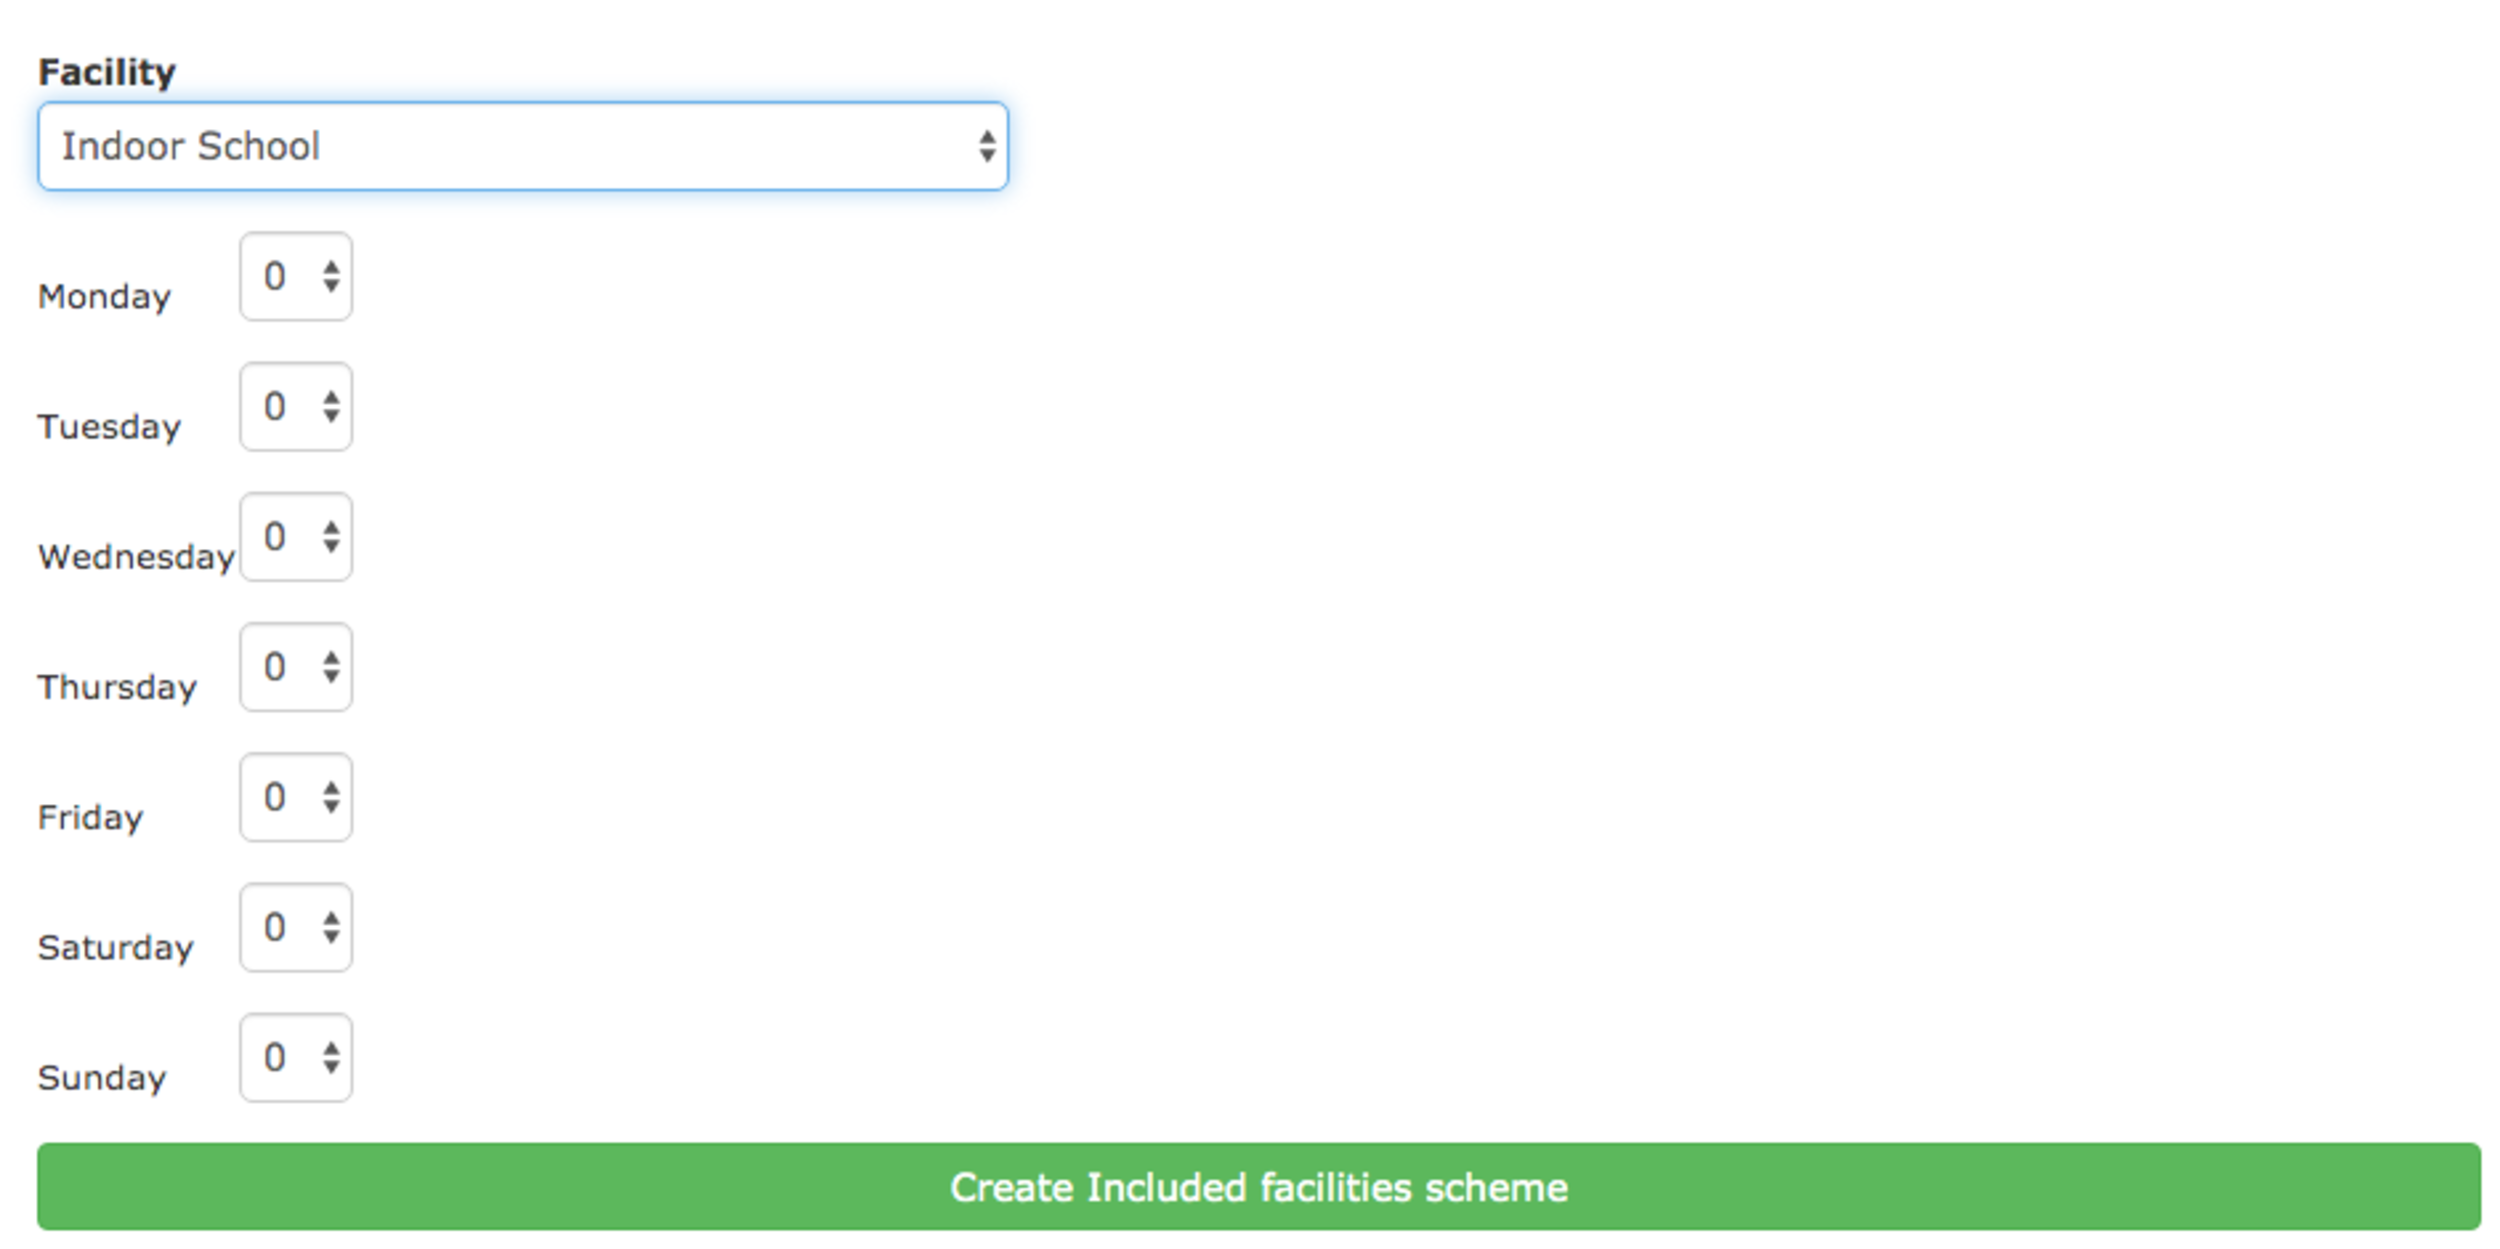
The first step is going to Admin → Services on the menu. Once there find the livery package you want to add a facility allowance to and then click on the edit drop down button. Find the ‘Edit Included Facilities Schemes’ button. Clicking this will bring up an overview of the existing facility allowances you have setup (shown below).
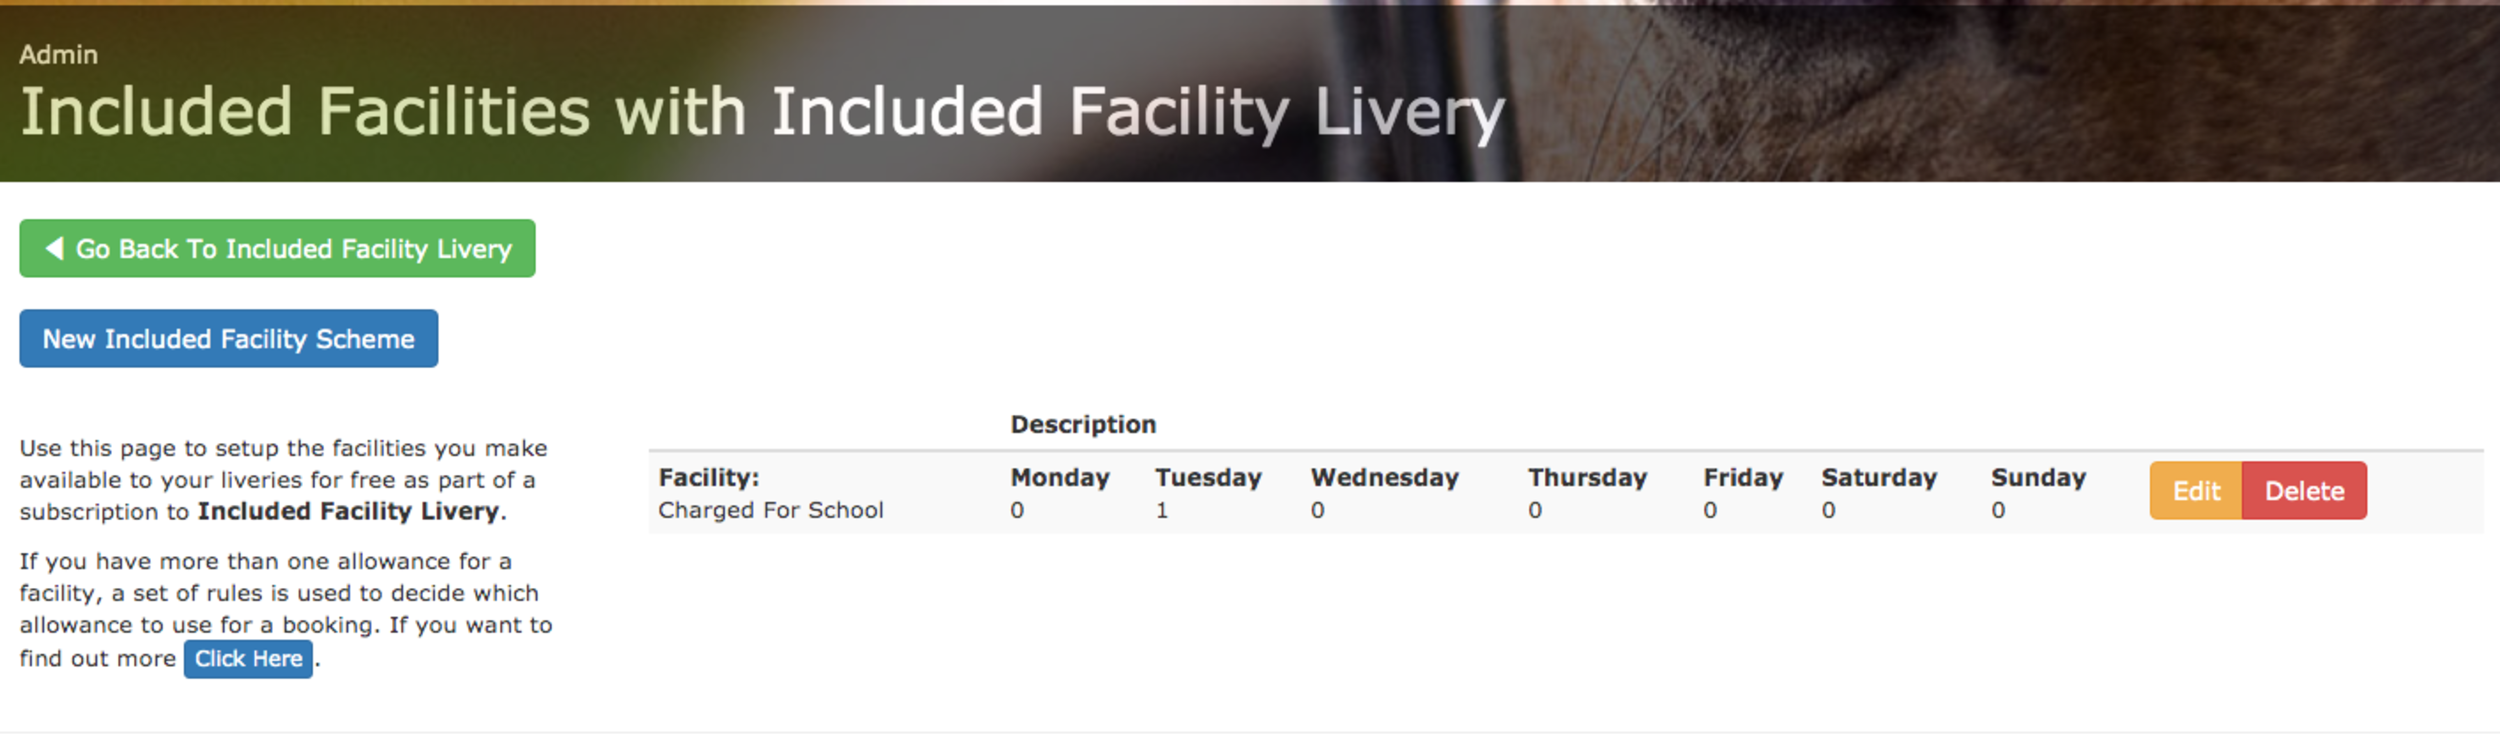
You’ll see all the existing schemes and the details of them. You can either click on Edit to make changes or click on New Included Facility Scheme to create a new allowance. This will bring up the scheme type selection screen which will allow you to choose the type of scheme that suits your needs. Once you’ve decided click on the ‘Create Scheme’ and you’ll be taken to the setup screen where you can fill in the details of the allowance.

You can create as many schemes as you need to allow you to encapsulate all the included facilities you offer as part of a package. The best part? Once setup it’ll just work. It’ll track everything for you either billing (or not billing) your customers as necessary.